Do you hear a constant trickling noise from your toilet? Does the fill valve turn on periodically with no input from you or anyone else in your home? These are signs that your toilet may be leaking, and a leaking toilet can waste hundreds of gallons of water per year. In addition to being annoying, that means it could also cost you a significant amount of extra money, and that’s something no homeowner likes to hear. The good news is that fixing the overwhelming majority of toilet leaks is extremely simple—they can usually be traced to one small part, the flapper.
What is a Toilet Flapper?
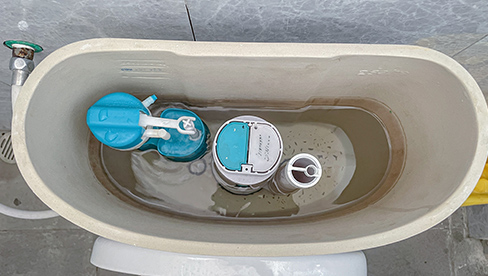
Your toilet flapper is a small rubber stopper in the bottom of your toilet tank that prevents water from the tank from flowing down into the bowl below. When you flush your toilet, the flapper lifts, exposing the drain and allowing the water to flow freely, creating the flushing action.
In order to create a proper seal, flappers are generally made from rubber, as it’s inexpensive, flexible, and seats easily. However, the tradeoff is that they corrode over time and will generally need to be replaced about every two years or so. Thankfully, you can replace the flapper yourself! They cost just a few dollars at your local hardware store and require no specialized tools or training to replace it.
How to Replace a Toilet Flapper
Step 1: Shut Off Your Toilet & Drain the Tank
- First, find your toilet’s connection to your home’s water supply, and then turn the knob on the valve clockwise to shut it off.
- Once the knob stops turning, your toilet will be separated from your main water supply, and you’ll be free to empty the tank.
- This is easy to do: just flush your toilet. Your tank will empty, but the bowl and tank will not refill, and the fill valve will not turn on.
Step 2: Remove the Old Flapper
- Remove the lid from your toilet tank, and you should find it empty.
- The flapper will be located at the bottom center of the tank, covering the drain that leads to your toilet bowl.
- It’ll also be connected to your toilet’s flush handle via a small metal chain or nylon string.
- Simply disconnect the flapper from the handle, which is usually at a small metal clip on the string itself.
- Once this is disconnected, you should be able to slide the flapper off its hinge and remove it from the toilet tank.
Step 3: Install the New Flapper
- Take your new flapper out of the package and slide the hinge end into the hinge bracket on the bottom of the tank to secure it in place.
- Then lower the flapper to make sure it properly seats over the valve. A proper seating should leave no gaps for water to escape into the tank below.
- Then connect the new string or chain up to the handle rod at the top of your tank, just like your old one was.
- Be sure to do a few test presses or pulls of the handle to make sure the valve lifts properly—it may take a few adjustments to get this right.
Step 4: Turn the Water Back On
- Turn your toilet’s water valve back on and let the tank fill properly.
- Once the fill cycle stops, listen closely for the sounds of dripping or trickling, which may indicate a leak. Take a good minute or so to do this: you don’t want to accidentally miss something.
- While doing this, keep an eye on your water level in your tank to see if you can see it dropping. If you can, or you hear the sound of trickling or leaking water, then the new flapper may not be seated properly.
- Shut off the water, flush the toilet to empty the tank, and try to adjust the flapper so it completely seals off the drain.
- Once you’ve readjusted it, turn the water back on and check again for the sounds or sights of leaking water.
If you’ve got the leak stopped, then you’re done! Replace the lid and your toilet is as good as new!
If you need your toilet repaired by a professional, call Smith's Plumbing, Heating & Air at (901) 290-1110 today and let our plumbers handle the issue for you!

.jpg.2603310916285.webp)